A hybrid guitar-dulcimer-mandolin.
Imagine designing and build an instrument from scratch in two weeks! In Early March 2015 I was in the middle of a long-term project learning to build guitars from scratch. I was doing this with a small group mentored by a good friend John Fabel. Since I already had experience making all kinds of things I also ended up making many tools and making tools to make tools.
Considering we only met once a week, some of the other folks had almost no wood-working experience and we were starting with logs it became obvious to me the process would continue for quite a while at a deliciously deliberate pace.
One Saturday two weeks before my wife’s birthday I decided I wanted to design and build an instrument as fast as possible – and inspired by a friends Merlin I drew up rough plans for a very simple guitar-dulcimer-mandolin hybrid. Two weeks later I was able to strum it.
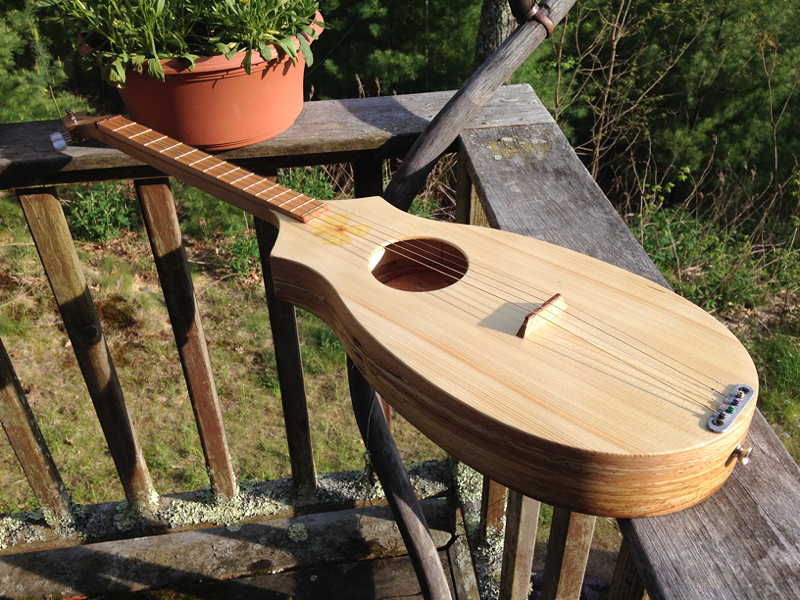
Dinalin: a hybrid guitar-dulcimer-mandolin.
Basics:
- Scale length: 600 mm (23 5/8”)
- Frets: 15, standard chromatic spacing
- Tuning: open D; D3, A3, D4, F#4
- Bridge: unglued (held down by string tension), butternut with manzanita strip
Originally the top was made from Adirondack spruce which sounded great. After developing a crack when I grasped the body too hard picking it up I replaced it with a new top of the same wood that was slightly thicker and slightly stronger bracing.
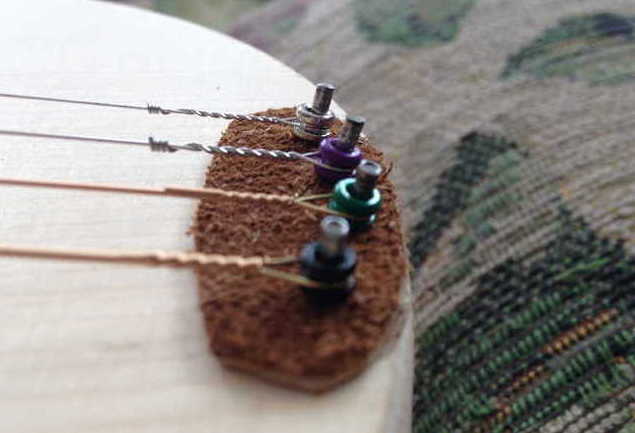
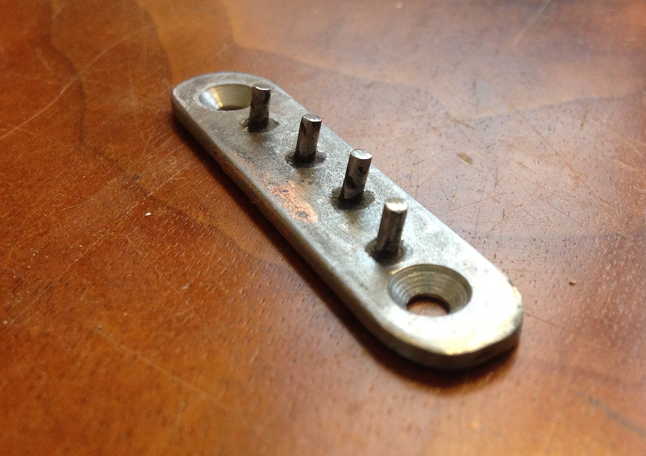
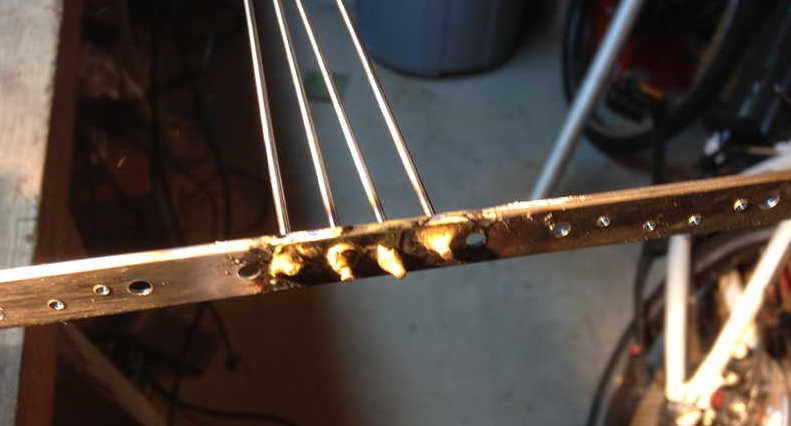
When I built it I terminated the strings by hooking them over little nails. Later I brazed short pieces of drill rod at an angle into a metal plate, drilled and countersunk two holes into the plate and screwed this plate into the tail of the instrument.
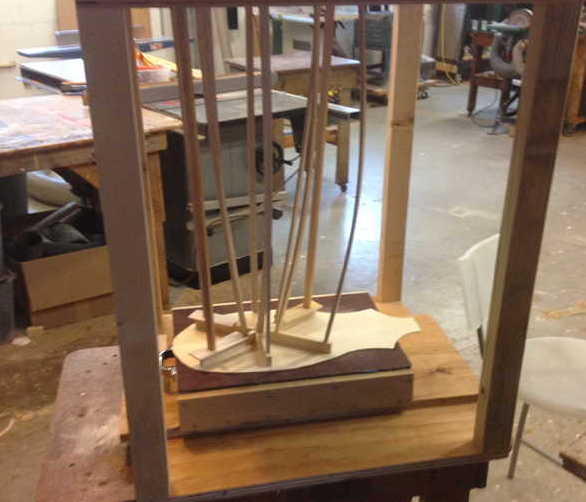
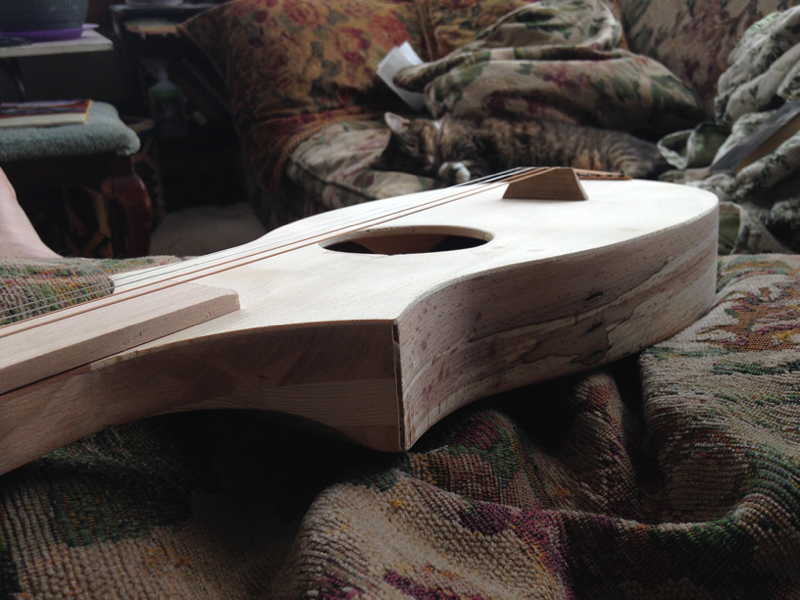
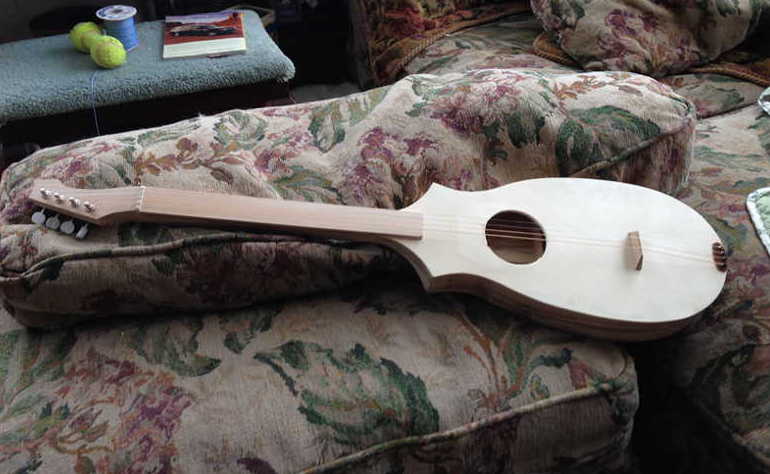
Here’s what it looks like now:
Four strings, 600 mm scale length, tuned to an open D: D3, A3, D4, F#4
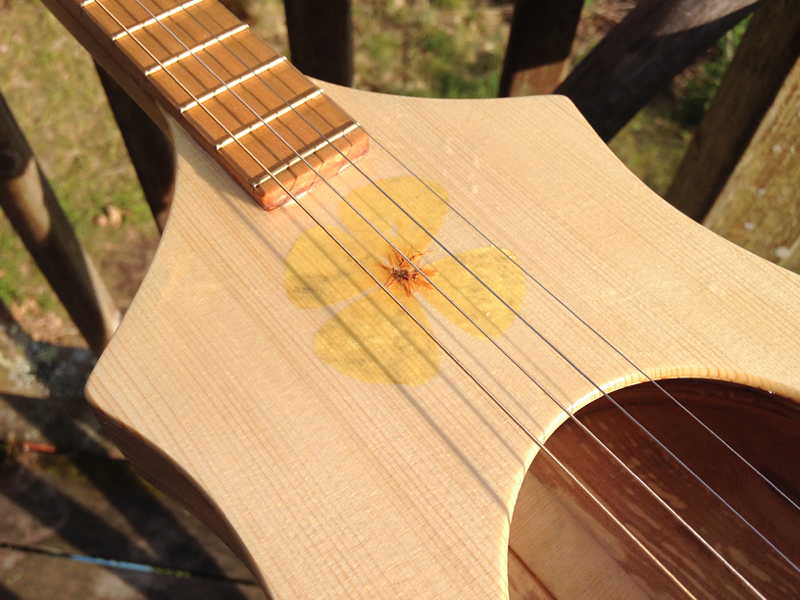
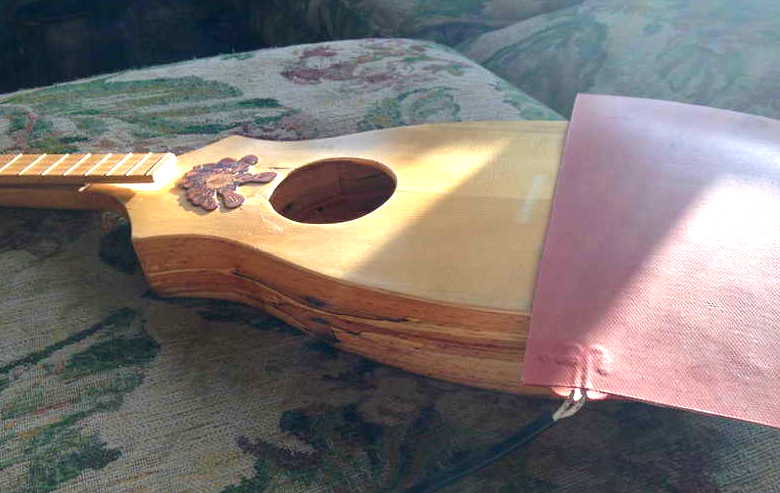
While finishing the second top with Delft spray lacquer I added a dried flower collected by my Dad in the desert outside of Tucson by gently laying it in a wet coat of lacquer before adding a couple more coats.
I was making this for my wife Dina so decided to call it a Dinalin.
I enjoy taking it with me if I am going to have to wait somewhere. Lots of people are intrigued and stop and ask me what it is. I tell them that I made it up and it’s sort of a hybrid between a guitar, mandolin, and dulcimer. Some accept that description but a large minority respond, “Yes, but what is it?”. I then tell them it’s a Dinalin. A number of these folks seem mildly disturbed because it’s not an instrument they have heard of. I remind them that it makes sense that they have never heard of a Dinalin since the one in front of them is the only one that exists and I made it up. Only some of them seem satisfied with this explanation.
If people look interested I ask them if they want to play it. I’m able to convince about half the people who start off saying, “Oh no, I don’t know how to play that.” to try it. I explain that since it has an open tuning they can just strum it without fretting. The next simple thing to try is to strum it while fretting the high F#4 string in different positions. If they play a note that sounds bad just go up or down one fret and it will all be OK again.
Here’s what it sounds like now when I’m not completely awake.
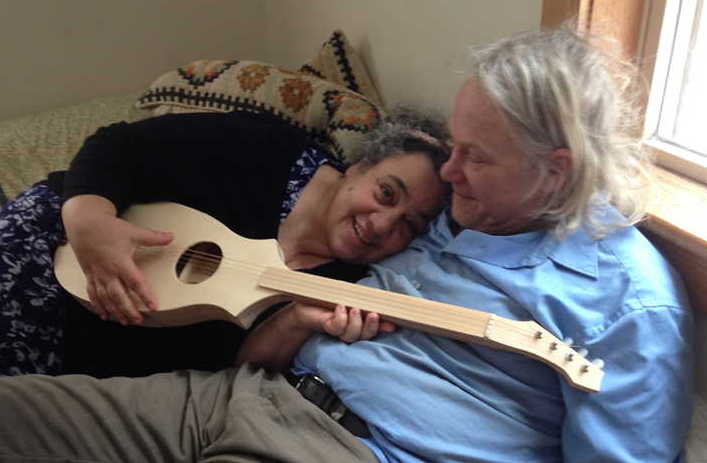
My guitar-building mentor John Fabel playing it with the original Adirondack spruce top.
Original design and build: March 2015.
I created the original design and built it over a period of two weeks in March 2015. I wanted to finish it as a present for my wife’s birthday. I started sketching the design on Saturday night and two weeks later it was complete except for frets.
I can enjoy going way down geeky cul-de-sacs as much as any nerd however I also find being in a situation where I have to keep making the best reasonable decision as quickly as possible exhilarating.
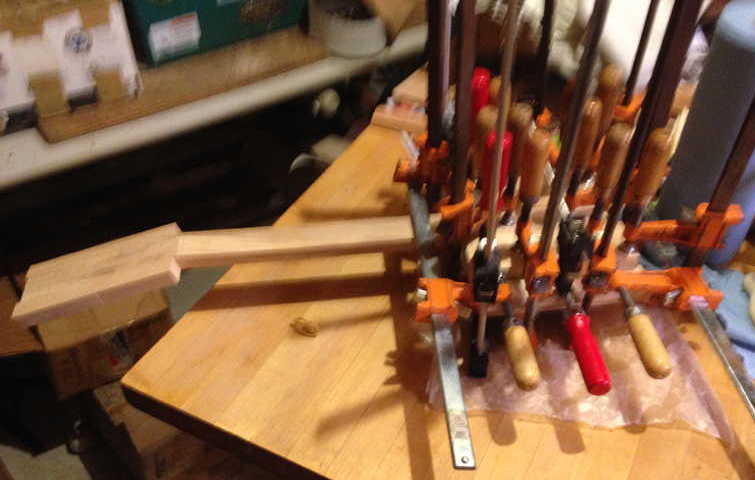
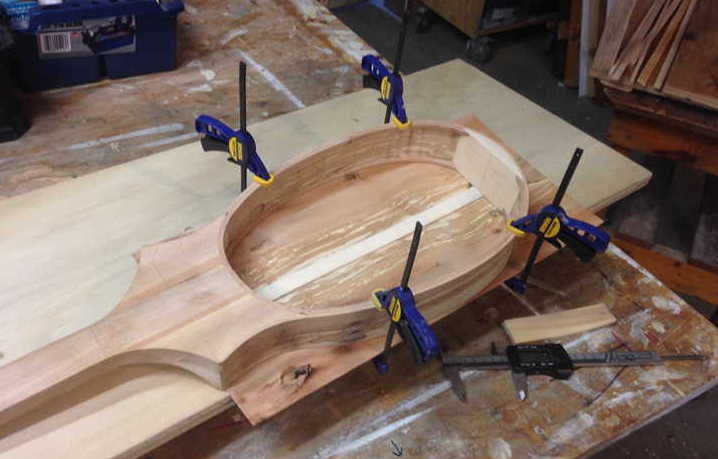
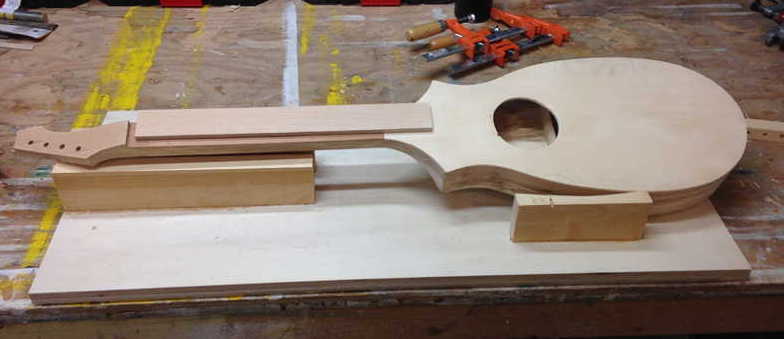
Neck and neck-body assembly.
I used a piece of clear straight beech to make the neck. I cut the end off at a 15 degree angle, glued ears to it, flattened both sides of the angle cut, flipped the headstock over and glued the angle cut on the headstock to the flat bottom side of the neck.
I designed a simple three layer section where the neck connects to the body. The neck itself is glued between two other sections of beech in the top layer. Below that is a section of white spruce with the grain oriented across the instrument. The bottom layer was another two pieces of beech. These three layers were then surfaced and glued together.
Hard to see the details with all the clamps and the picture out of focus.
After the glue set up I created curves on the outer edges of this assembly to glue the sides to.
This assembly ended up being a very strong, stable, and simple way to join the neck to the body. When I make another I’ll probably adapt this assembly to support a truss rod.
Bending the one piece side by hand – no time to build a mold.
I had a beautiful 40” long piece of spalted beech to use for the sides.
In a guitar normally there are two curved side panels that gently clamped in a shaped mold and are joined by gluing to blocks at the head and tail.
I didn’t have time to make a mold so I bend the single long side panel by hand by gently moving it back and forth and applying force over a heated section of heavy aluminum pipe.
When the wood is just starting to warm up it resists an applied bending force a spings back to its original shape when the force is removed. When the wood gets hot enough the lignin, which is sort of a thermoplastic between the cells, starts to soften and the longitudinal cells on the outer edge of the curve start to slide past each other just a bit.
In order to get the lignin soft enough to bend the panel the aluminum tube is usually hot enough to burn the wood if left in one place too long so it’s important to always keep the panel moving back and forth.
I tried to get close to the curves I had drawn. The side weren’t perfectly symmetrical but they were close.
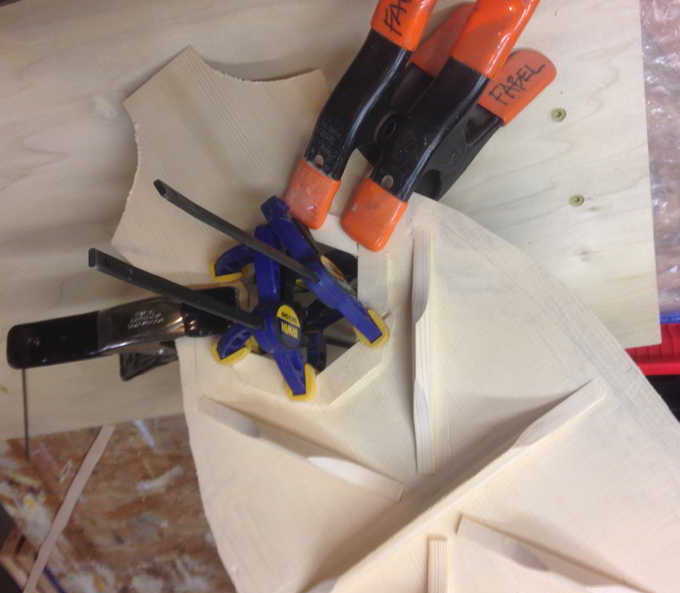
Clamping bent sides to neck assembly: top view.

Making the back and top panels out of beech and Adirondack spruce.
Preparing the panel edges for gluing.
Both the back and top were made out of two pieces glued together. Before gluing the two edges had to be perfectly flat and straight.
Straightening back panel beech edges before gluing.
Rough trimming the back panel.
Getting ready to trim the glued beech back panel a bit larger than the shape of the body.
Also note the beech end block glued onto the interior of the sides at the end. This will serve as a stable strong element for securely terminating the strings.
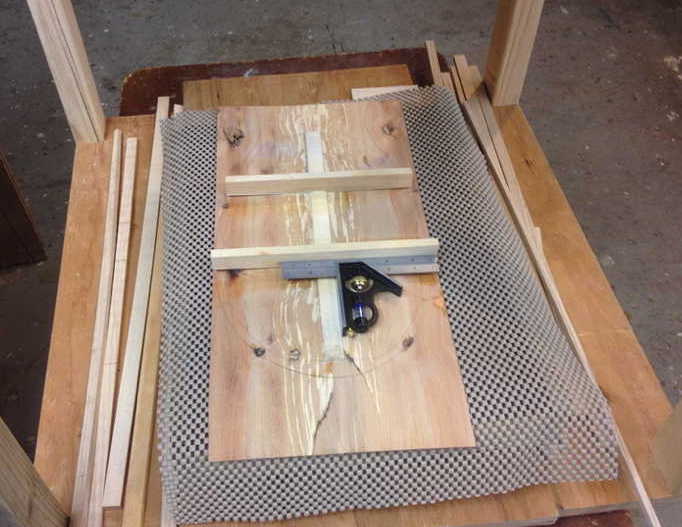
Tracing shape of sides onto back panel.
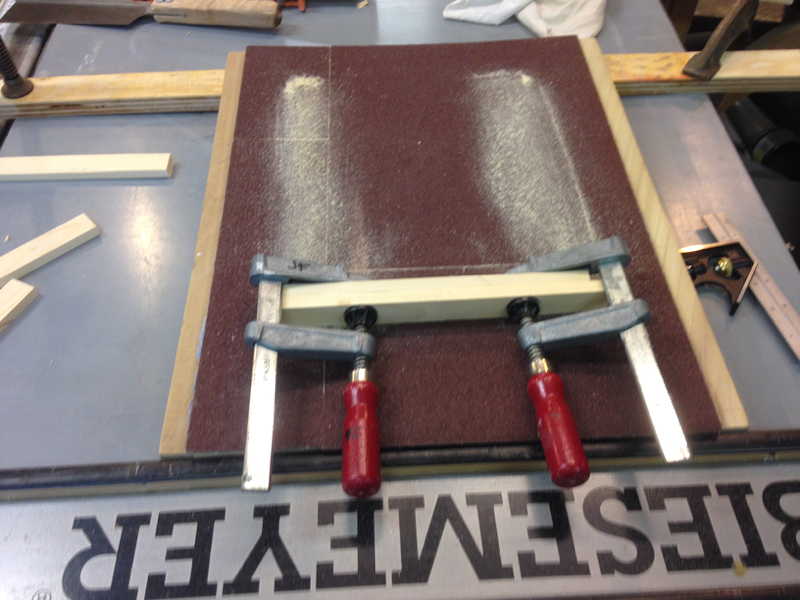
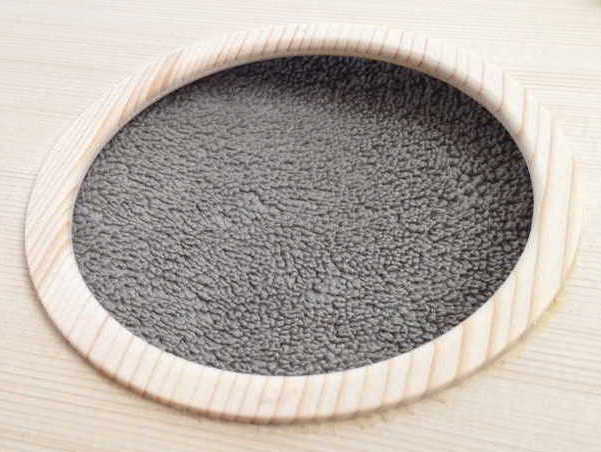
Sanding an eight foot radius curve into the braces for the top and bottom panels.
The braces for both the top and back were shaped and then glued to their respective panels using an eight foot radius cylindrical dish surfaced with sandpaper.
Sanding radius curves on back braces.
Extending the gluing surface on the edge of the side.
The gluing surface on the edges where the top and bottom are glued to the sides needs to be extended to create a stronger joint. Normally this is done with kerfing strips ( a strip with many saw cuts so it can be bent easily). Instead I bent a series of small beech strips into the same shape as the sides and glued them onto the sides to build up this gluing surface.
Gluing curved strips to reinforce where top and bottom are glued to sides.
Gluing the slightly curved braces onto the back.
Preparing to glue curved braces to back in eight foot cylindrical radius dish.
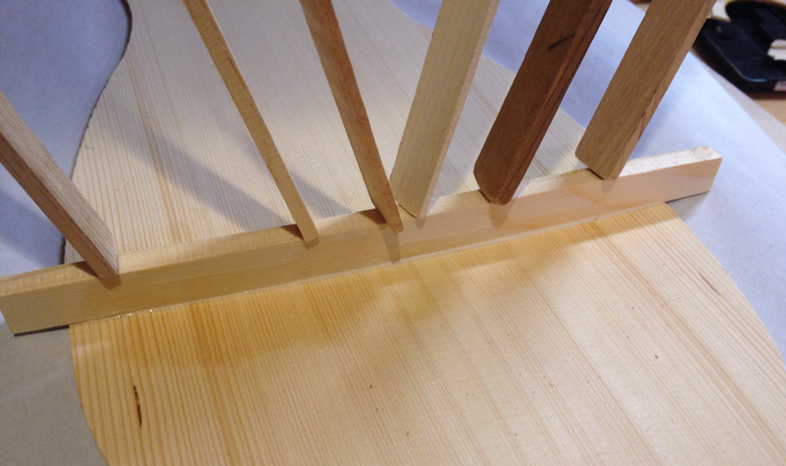
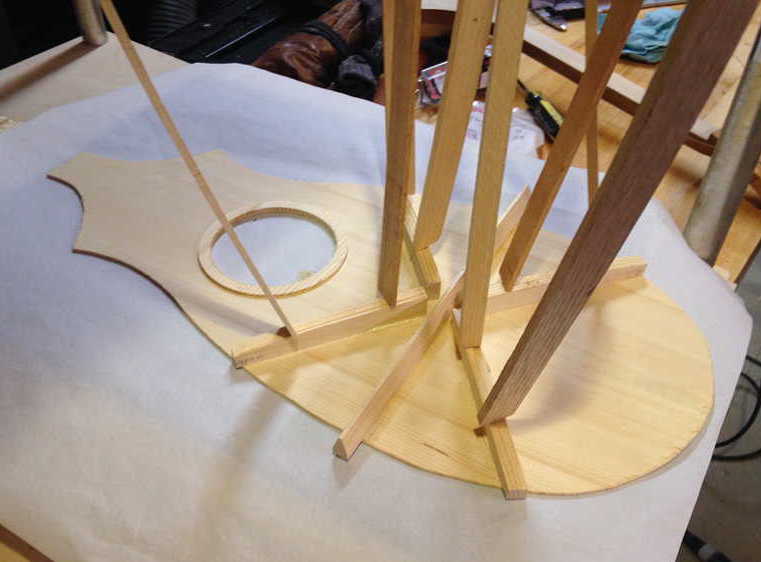
This is all happening in the go-bar deck shown below. There is a solid top (not visible in this picture) and any number long of springy flexible pieces of wood can be placed in a curve to provide compression to hold the braces against the top or bottom.
Gluing curved braces to the top in go-bar deck.
Gluing the slightly curved back onto the sides.
I shaped and sanded the braces on the back and got it ready to glue to the side. Look closely and you can see the curved reinforcing strips glued on the edge of the side.
Getting ready to glue back to side.
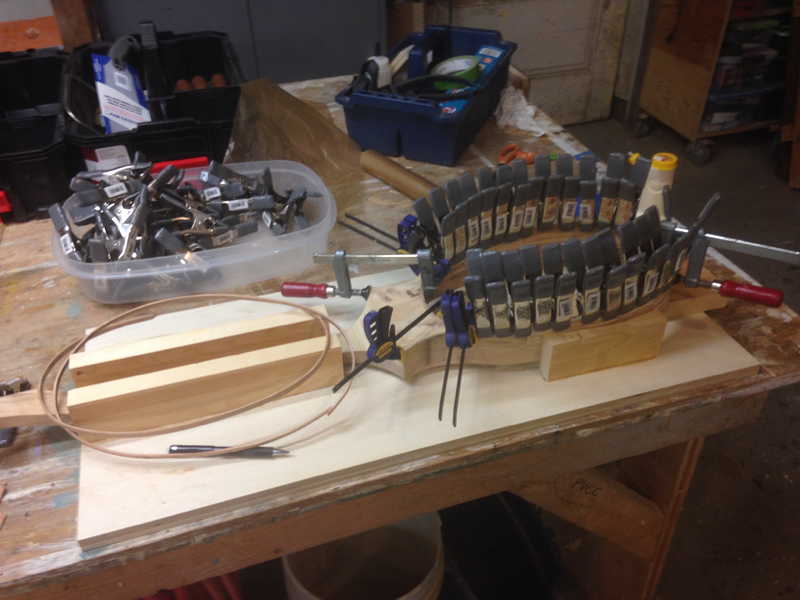
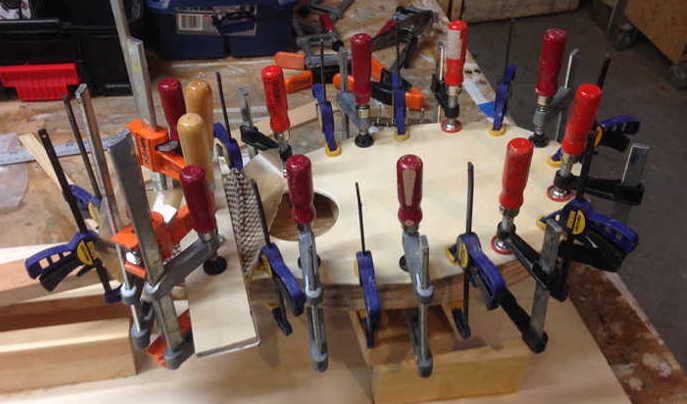
Using lots and lots of clamps to glue the back to the side.
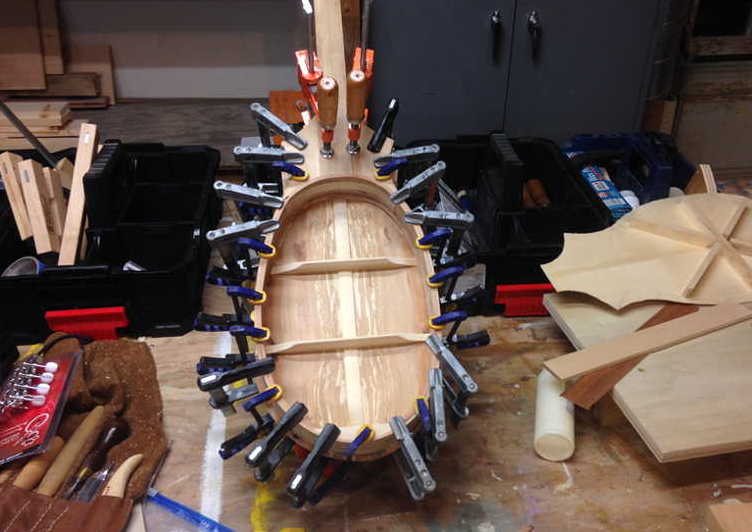
Notes:
- I don’t have any pictures of how the back of the neck assembly was curved with a bandsaw, rasps, and sanding before this step.
- Look close and you can clearly see the three glued layers of the neck assembly at the top of the photo. The middle whiter wood is the white spruce.
- The braces have been glued to the top sitting to the right and still need to be shaped and sanded.
Cutting out and reinforcing the soundhole in the top.
After shaping and sanding the braces on the top I found a plastic lid that seemed to be about the right size for the sound hole, used it to trace a circle, drilled a starting hole and then used a coping saw blade to cut out the sound hole.
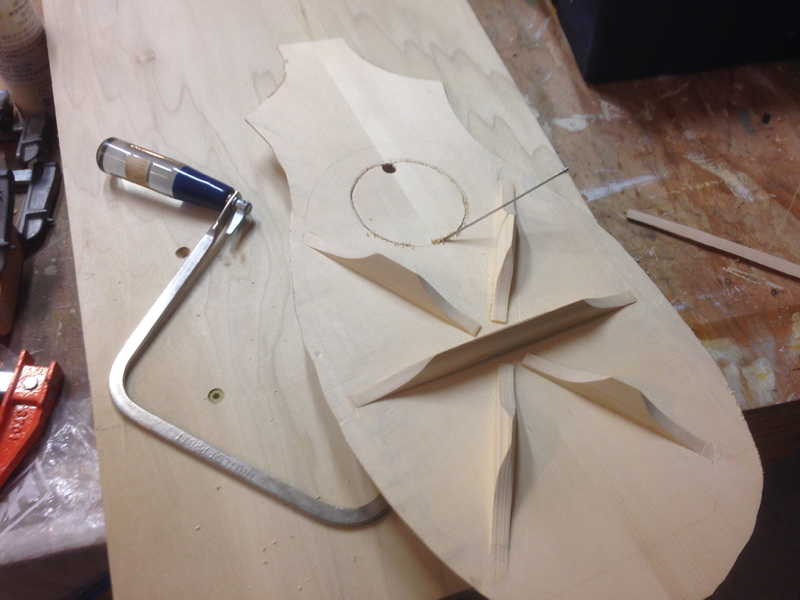
I added a second layer with six pieces cut from top panel scrap in a rough hexagon to reinforce the edge of the sound hole.
Setting the proper angle for the neck to body join.
At this point I’m almost ready to glue the top on but the whole instrument would not have worked correctly if I had. To be playable the strings have to be close to the frets on the fretboard.
I was planning to use a bridge held in place just by string tension. To do this the strings need to cross over the bridge and then angle down somewhat to termination points at the tail of the body.
At this point the top of the sides defined a glue-able surface that just extended parallel to the plane of the fretboard.
One way of thinking about what I had to do was to angle the neck and fretboard down down just a bit away from the plane of the top. When building a guitar the joint where the neck attaches to the body is very carefully and precisely done to get this angle just right. However I had already secured the neck with a three-layer glued neck-body assembly lamination so it was not going to move at all.
Without any real data or analysis to guide me I decided a one inch height of the bridge above the top would be high enough to provide the right down pressure from the strings to the bridge to:
- Hold the bridge in place.
- Effectively transmit energy in the vibrating strings through the bridge to the top.
- Don’t create so much downward pressure to cause flattening or crack the top.
To get the right angle I turned the body over and sanded the sides and reinforcing strips in the eight foot cylindrical sanding dish putting most of my downward pressure on the tail end of the top.
I had already calculated where the bridge wold go on the top and I’d regularly pause and use a long straight edge to see how much lower the top (to be glued on after this step) was below the extension of the fretboard plane.
Surprisingly this was actually very easy and quick to do precisely.
One issue when either sanding with a block or against a block is ending up with a curved surface as the block or object rocks a bit moving back and forth. In this particular case having a small curve added in the sanding process just made the top look a bit better. I had curved the top with just a cylindrical sanding dish instead of spherical dish because it was much easier to make. The top itself also had the flexibility to be bent into a slight compound curve.
The other function of sanding the gluing surfaces with the cylindrical sanding dish was to make the right angle on that gluing surface so the slight curve already established in the top when (with the glued curved braces) extends in a continuous form right to the edge of the body.
Unfortunately I don’t have any pictures so I’m going to include one here from a bit further on in the process. You can see the strings are extending away close to parallel with the fretboard and continue to the top of the bridge where they angle down to the string termination points.
Later after adding frets I reduced the height of the bridge a bit to lower the strings so they were closer to the fretboard. This made it easier to play.
Gluing the top on.
You can see a thin piece of mahogany already glued to the top of the neck. This piece is the same thickness as the top so that later I can glue the fretboard across both the neck and the top.
Note: all the glue used was LMI Yellow Instrument glue.
Attaching the fretboard.
I used another piece of clear beech for the fretboard. The gluing surface starts along the mahogany shim strip on the neck and extends to just past the 15th fret position on the top, however in order to get this ready in time for Dina’s birthday I just used double-stick tape to hold the fretboard in position!
Using brad nails to terminate and hold the strings.
I didn’t think this would really last all that long but using tiny nails hammered through the top and into the solid beech end block was a very quick way to hold the end of the strings.
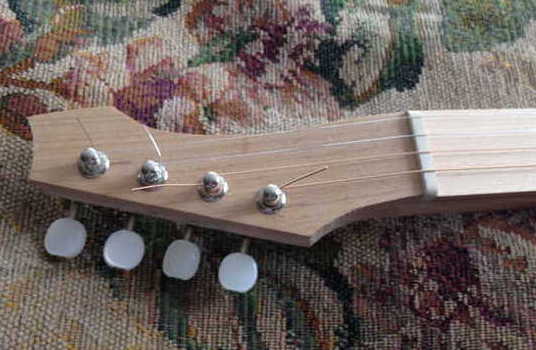
Shaping the headstock and installing mandolin tuners.
I had fun figuring out a shape I liked for the headstock and the position for the mandolin tuners that would result in straight string pulls.
Making a lightweight pushdown bridge with butternut.
The original bridge was made from butternut, a relatively soft and light hardwood. This bridge is not glued down and is held in place by the downward force of the strings. When I change the strings I place the bridge in roughly the correct location and tune the strings. Then I reposition the distance and angle of the bridge until the pitche of each strings octave note played on the 12th fret matches the octave harmonic produced when just lightly fingering the string directly above the 12th fret during the initial part of a pluck.
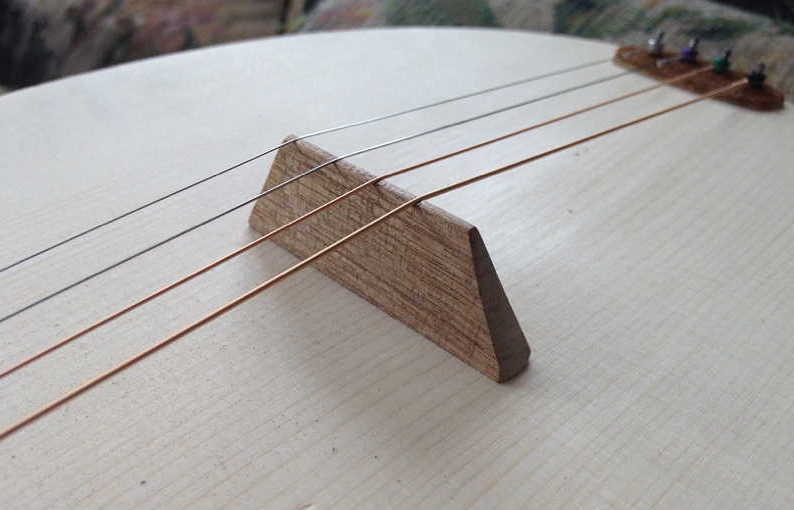
Later I made another bridge from butternut with a small strip of manzanita glued to the top to provide a harder, tougher surface for the grooves where the strings run through.
Ready by Dina’s birthday!
The fretboard (without frets) is just held down with double-stick tape but it’s relatively complete and sounds nice!
And it was strumable on the morning of Dina’s birthday!
Frets.
I used a long ruler with markings at 0.01” intervals, a good magnifying glass and bright lights to mark out the positions for the frets. I made a sort of a sliding miter box with an inspection hole cut in the miter box slot over the middle of the fret board. The sliding miter box had side rails to keep it aligned with the fret board. I used the magnifying glass to align it with a mark, clamped the side rails to fretboard, and used a Japanese pull saw to cut the fret slots.
Pultruded carbon fiber rods laminated on the back of the neck.
After fretting, restringing, and playing I thought the neck had just a bit more curve than ideal. I hadn’t designed it with a truss rod so I laminated two pultruded carbon fiber rectangular rods on the back of the neck and covered them with Hard Maple so the neck wouldn’t bend any more. It hasn’t – but the next one should have some kind of truss rod.
Empirical compensation of saddle and nut.
I made a nut with manzanita and a new butternut bridge with a small strip of manzanita glued along the top.
I then started an iterative empirical process to develop reasonable compensation offsets for the saddle and nut. Putting a tiny radius with a very fine file on the sharp leading edges of the tuner peg holes and a good string winder turned out to be very useful in this process.
A new top and other improvements: Jan 2016.
The Adirondack spruce top sounded great. I enjoyed the clarity and sustain when playing softly and if I was hanging out near a fire with a number of inebriated people playing and singing loudly with more commitment than precision I could hammer the strings with a large stiff pick and the initial very loud attack would more than represent my commitment!
The top was definitely strong enough to withstand the downward force from the strings … but it was a bit too fragile with the way I sometimes handled and/or abused the instrument. One day when I picked it grasping the body with one hand I cracked the top near the edge.

I made a new top that was stronger in the following ways:
- A tiny bit thicker.
- The braces were just a bit bigger and made of a denser stronger white spruce.
- Continued the main top cross brace all the way to the edge instead of feathering it out just before the reinforcing strips glued to the side.
I also replaced the brad nails used to hold the strings with a brazed and machined part that is much stronger and more durable.
First step removing existing fretboard and top.
I used a silicone heating pad to soften the glue used when the fretboard and top were installed. At high temperatures the LMI Yellow instrument glue starts to soften and it becomes possible to separate glue joints with little or no damage using very thin prying/scraping knives.
Since I was replacing the original top I didn’t worry about causing damage to the original top.
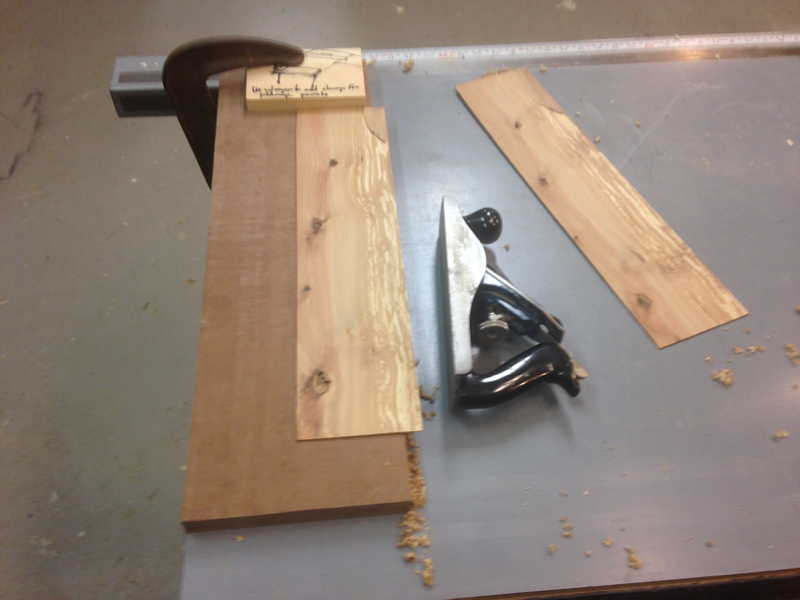
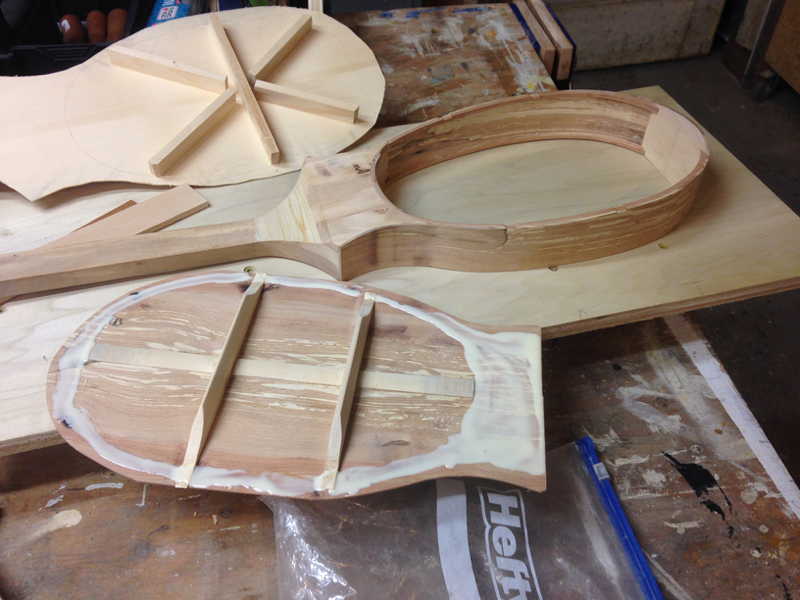
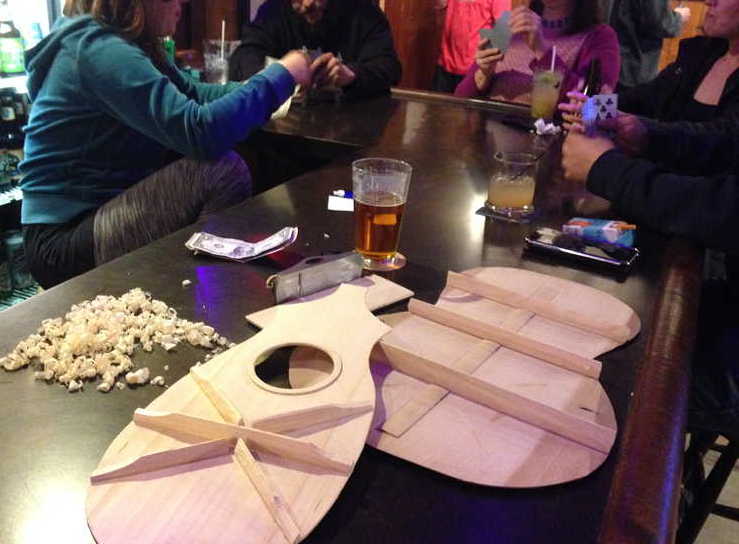
The body and neck cleaned up after removing original top and fretboard.
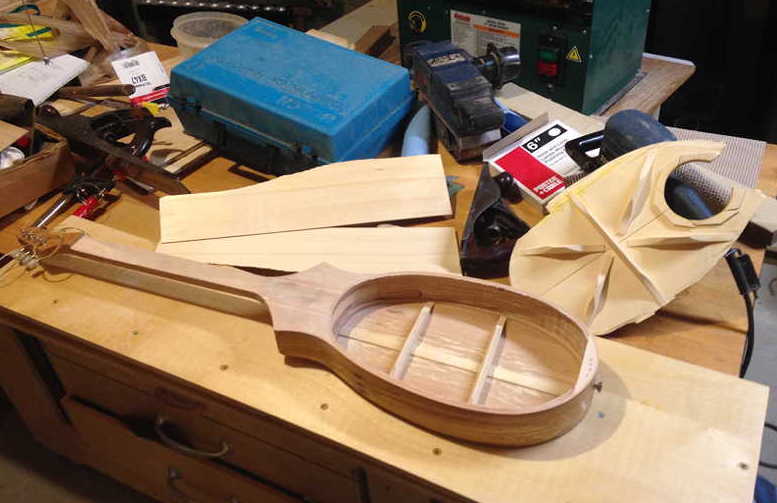
The two flat panels next to the cleaned up body are the new slightly thicker panels of Adirondack spruce for the new top.
Gluing two panels together to create new top.
At this point I was further along in the process of building guitars and I used this tool I had made for reliably gluing thin panels together.
The edges of the two panel sections to be glued have already been made perfectly flat and straight and covered with glue. They are brought together on the four lower members which are flat, straight, and parallel. The triangular wedges are placed on top of the two panels. Then the rope is wound over each triangular wedge, around the edge of a panel section, under a lower section, back around the edge of the opposite panel section and then back around the triangular wedge.
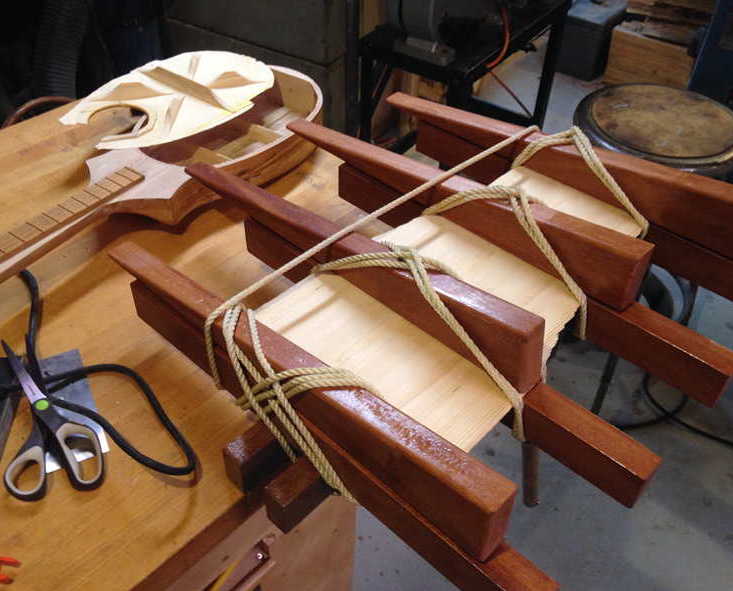
Once this is all set up the wedges are driven gently inward which tightens the rope. This does two very useful things:
- It causes the ropes to tighten and drive the bottom of the wedges into the panels pinning them against the lower flat, straight, and parallel rails.
- It also causes the ropes to tighten on the outside edges of both panels driving the two panels together and clamping the glue joint.
Gluing main cross brace on new top.
The bottom of the brace is curved to an eight foot radius and is being glued to the top using the compression sticks in the go-bar deck to clamp the assembly onto the eight foot radius cylindrical sanding dish.
A more elegant way to cut and reinforce the sound hole.
By this time I had also created a precision circle-cutting jig for my old router which I was using to cut sound holes for the guitars I was making.
To create the reinforcement for the edge of the sound hole I first used the circle cutting system to create a disk that was about 20 mm greater in diameter than the sound hole I wanted and then glued it to the top. The grain in the reinforcing disk is shifted 90 degrees from the grain orientation in the top to increase the overall strength of the lamination.
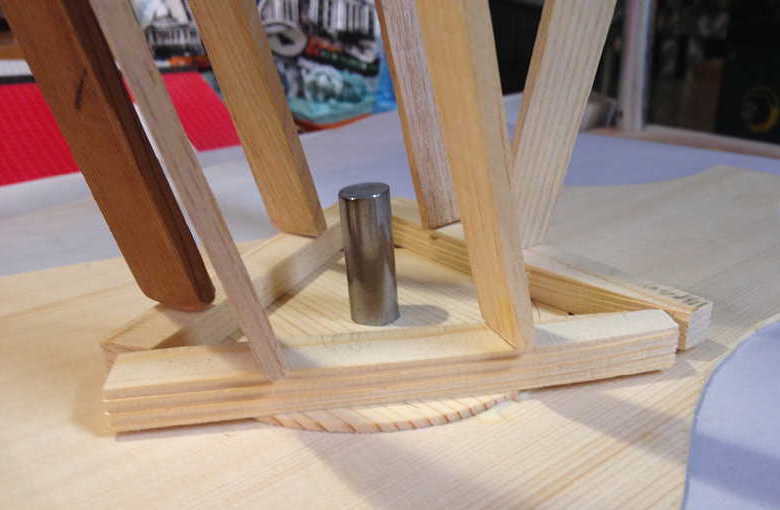
I used a one half inch steel pin to center the disk with the center of the sound hole in the top and then glued the two together.
In the next photo the router with the circle cutting jig is upside down and the top is resting on a polycarbonate base and rotating on the steel pin attached to the polycarbonate base. The router has a 3/32” diameter bit which cuts out a circle as the top is rotated on the steel pin.
Cutting sound hole through top and reinforcing disk.
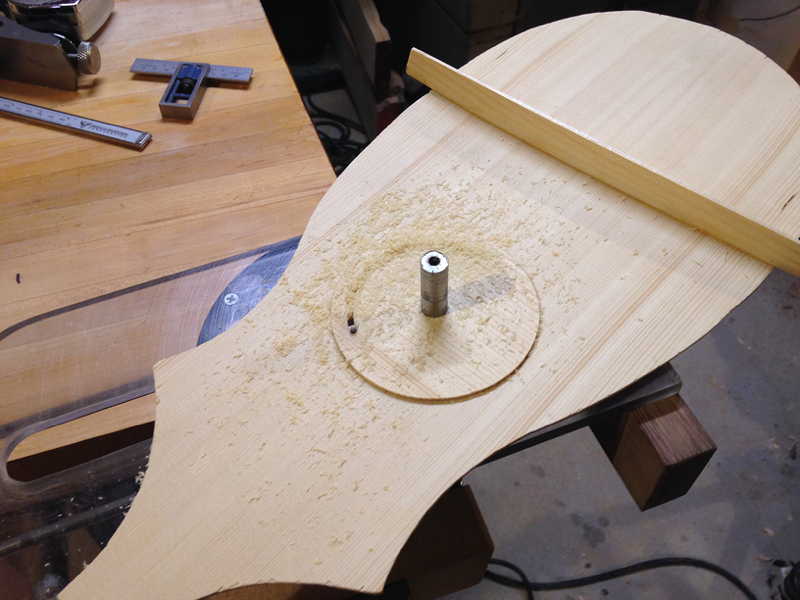
It’s important to be precise and gentle at the very end of the rotation that cuts the circle because once the cut is complete the top is no longer securely registered to the rotational axis of the steel pin.
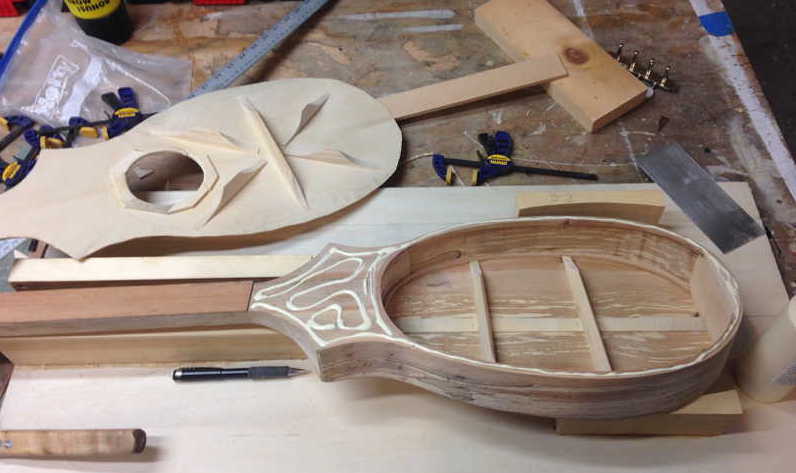
Completed sound hole with cross-grain reinforcement
More about the router-based circle cutting jig.
The center disk is what’s left after completing the circle cut.
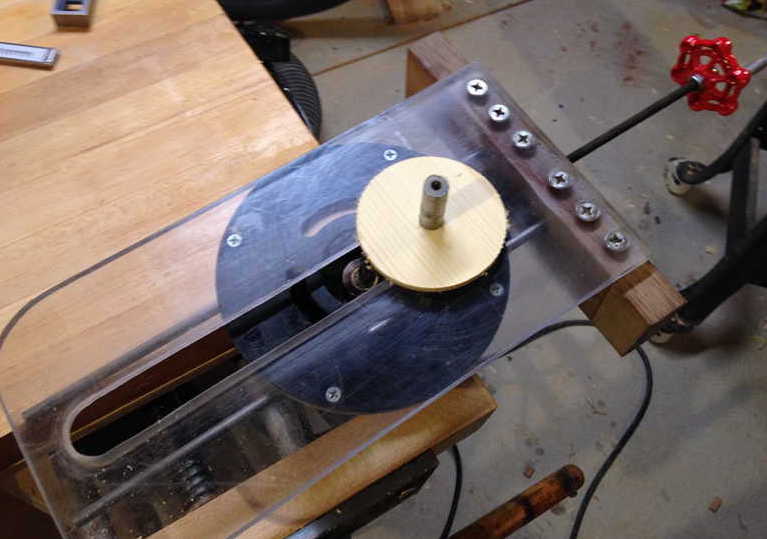
The polycarbonate base is screwed to six tapped holes in a block of Micarta, a dense thermoplastic resin and linen laminate.
The router can be moved closer or further from the steel guide pin and then clamped on the two hardened steel rails.
The threaded shaft in the upper right with the red faucet handle has a 1 mm pitch and goes through a threaded insert in the Micarta block. When the router is snug against the end of this shaft one clockwise rotation of the red handle will move the router 1 mm away from the steel guide pin and increase the diameter of the circle by 2 mm.
Gluing the top diagonal braces using the go-bar deck and radius dish.
The bottom glue surface of these braces have also been curved to an eight foot radius.
Shaping and sanding the top and bottom braces.
Almost final shape of top braces.
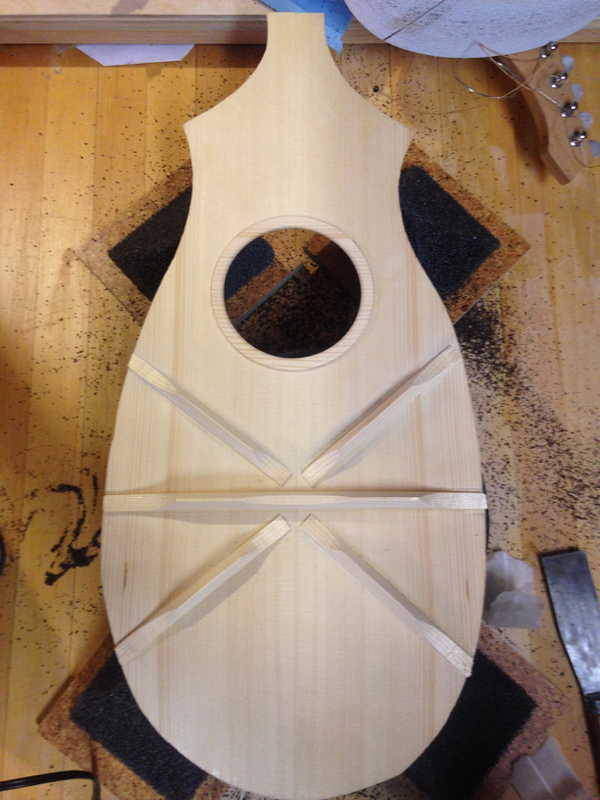
I feathered the outer ends of the diagonal braces so they ended just at the inner edge of the side reinforcing strips.
The cross brace was feathered down to a thickness of about 0.8 mm at the outer edge of the side. This meant I needed to cut precise mortices in the sides and associated reinforcing strips to receive the braces before completing the gluing of the new top.
A new stronger machined steel string termination system.
The small brad nails which held the strings at the tail end of the instrument had been slowly bending so I designed a much stronger system to replace them.
The drill rods are just slightly smaller than the diameter of the cylindrical eyes on the end of the guitar strings and the are brazed into the steel plate at an angle that is perpendicular to the angle of the string. This plate is screwed into the beech end block glued into the sides at the tail of the instrument.
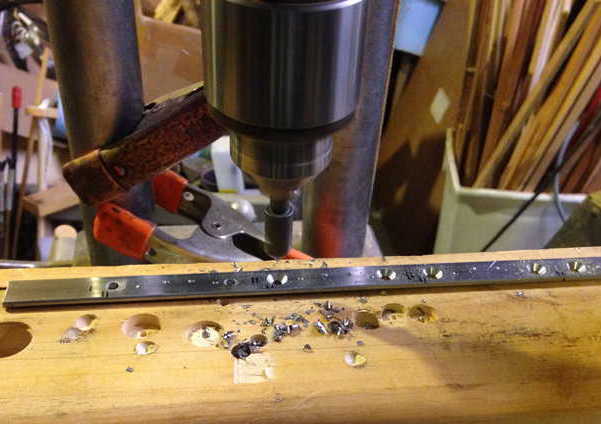
A jig for drilling angled holes in the steel plate
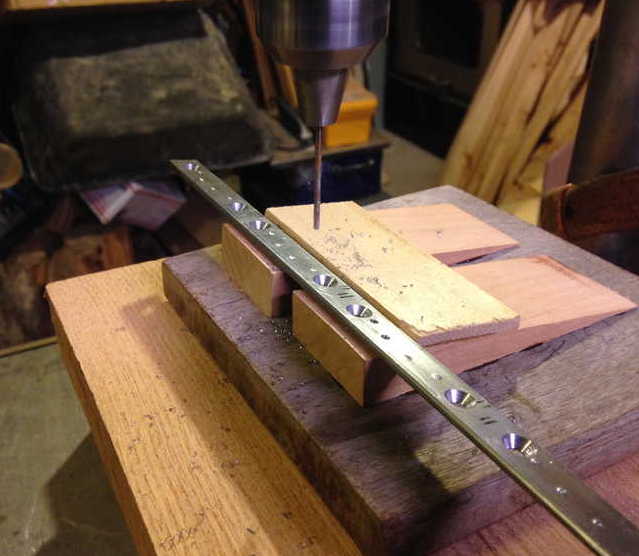
Drilling countersinks for attachment screws.
Brazing drill rod into steel plate.
Chord fingerings for open D.
Still to be written …